Tip. This will
hold the overview code for the Application. Then enter the following code:
package tip;

import javafx.application.Application;
import javafx.stage.Stage;
import javafx.fxml.FXMLLoader;
import javafx.scene.Scene;
import javafx.scene.layout.BorderPane;

public class Tip extends Application {
  @Override
  public void start(Stage primaryStage) {
    try {
      FXMLLoader loader = new FXMLLoader();
      BorderPane root =
        (BorderPane)loader.load(getClass().getResource("TipGUI.fxml").openStream());
      primaryStage.setScene(new Scene(root));
      primaryStage.show();
    } catch (Exception e) {
      e.printStackTrace();
      System.exit(1);
    }
  }
  public static void main(String[] args) {
    launch(args);
  }
}
TipGUI
Make sure you have created this file in the package, and not in the src directory.
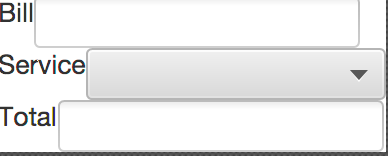
Editing the raw XML document can be extremely tedious. Luckily, there is a extension called SceneBuilder that you can use to graphically add components.
Now, save the GUI and close SceneBuilder. Refresh the FXML document in Eclipse to see the changes you made in SceneBuilder.
Service.
Add the following code:
public enum Service {
  POOR {
    @Override
    public double tip() {
      return 0.1;
    }
  }, GOOD {
    @Override
    public double tip() {
      return 0.15;
    }
  }, GREAT {
    @Override
    public double tip() {
      return 0.2;
    }
  };

  abstract public double tip();

  public double computeTotal(double bill) {
    return (1.0 + tip()) * bill;
  }
}
TipController. This gives us a way
to respond to the clicks and keys pressed when the program is running. Notice
the calculate method, which will compute the tip amount based on the selected
options in the app.
Add the following code:
import javafx.fxml.FXML;
import javafx.scene.control.ChoiceBox;
import javafx.scene.control.TextField;

public class TipController {

  @FXML
  private TextField bill;

  @FXML
  private ChoiceBox tips;

  @FXML
  private TextField total;

  @FXML
  public void initialize() {
    bill.setEditable(true);
    total.setEditable(false);
    for (Service s: Service.values()) {
      tips.getItems().add(s);
    }
    tips.getSelectionModel().select(Service.GOOD);
  }

  @FXML
  public void calculate() {
    double billEntered = Double.parseDouble(bill.getText());
    Service level = (Service)tips.getSelectionModel().getSelectedItem();
    double totalAmount = level.computeTotal(billEntered);
    total.setText(String.format("%7.2f", totalAmount));
  }
}
Add a Button to the VBox between the second and third HBox elements. Change the text to "Calculate Total".
On the left side, go to Document → Controller. Select tip.TipController in the drop-down menu.
Your GUI should look like this
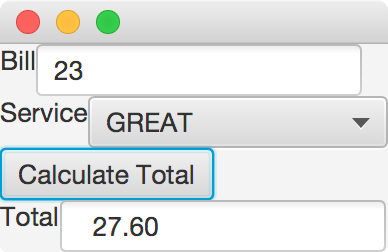
Run Tip and test the program.